
Page 112 - PlatinumTools端子光纤工具
P. 112
Index & Reference
ezEX-RJ45 and EZ-RJ45 Connectors Prep & Crimping
®
®
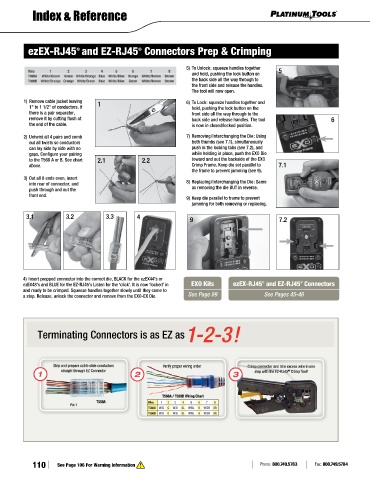
5) To Unlock: squeeze handles together 5
and hold, pushing the lock button on
the back side all the way through to
the front side and release the handles.
The tool will now open.
1) Remove cable jacket leaving 1 6) To Lock: squeeze handles together and
1” to 1 1/2” of conductors. If hold, pushing the lock button on the
there is a pair separator, front side all the way through to the
remove it by cutting flush at back side and release handles. The tool 6
the end of the cable. is now in closed/locked position.
2) Untwist all 4 pairs and comb 7) Removing/Interchanging the Die: Using
out all twists so conductors both thumbs (see 7.1), simultaneously
can lay side by side with no push in the locking tabs (see 7.2), and
gaps. Configure your pairing while holding in place, push the EXO Die
to the T568 A or B. See chart 2.1 2.2 toward and out the backside of the EXO
above. Crimp Frame. Keep die set parallel to 7.1
the frame to prevent jamming (see 9).
3) Cut all 8 ends even, insert
into rear of connector, and 8) Replacing/Interchanging the Die: Same
push through and out the as removing the die BUT in reverse.
front end.
9) Keep die parallel to frame to prevent
jamming for both removing or replacing.
3.1 3.2 3.3 4 9 7.2
4) Insert prepped connector into the correct die, BLACK for the ezEX44’s or
®
®
ezEX48’s and BLUE for the EZ-RJ45’s Listen for the ‘click’. It is now ‘locked’ in EXO Kits ezEX-RJ45 and EZ-RJ45 Connectors
and ready to be crimped. Squeeze handles together slowly until they come to
a stop. Release, unlock the connector and remove from the EXO-EX Die. See Page 89 See Pages 45-46
Terminating Connectors is as EZ as 1-2-3!
110 See Page 106 For Warning Information Phone: 800.749.5783 Fax: 800.749.5784