
Page 111 - PlatinumTools端子光纤工具
P. 111
We Make Connections EZ! Index & Reference
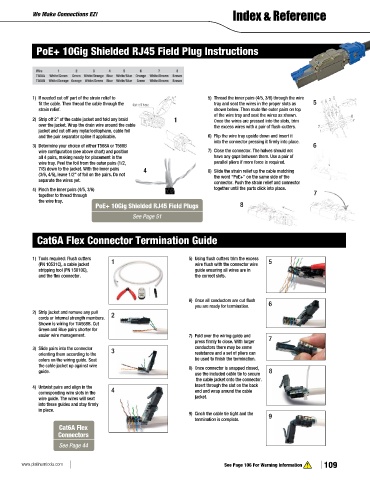
PoE+ 10Gig Shielded RJ45 Field Plug Instructions
1) If needed cut off part of the strain relief to 5) Thread the inner pairs (4/5, 3/6) through the wire
fit the cable. Then thread the cable through the tray and seat the wires in the proper slots as 5
strain relief. shown below. Then route the outer pairs on top
of the wire tray and seat the wires as shown.
2) Strip off 2” of the cable jacket and fold any braid 1 Once the wires are pressed into the slots, trim
over the jacket. Wrap the drain wire around the cable the excess wires with a pair of flush-cutters.
jacket and cut off any mylar/cellophane, cable foil
and the pair separator spline if applicable. 6) Flip the wire tray upside down and insert it
into the connector pressing it firmly into place.
3) Determine your choice of either T568A or T568B 6
wire configuration (see above chart) and position 7) Close the connector. The halves should not
all 4 pairs, making ready for placement in the have any gaps between them. Use a pair of
wire tray. Peel the foil from the outer pairs (1/2, parallel pliers if more force is required.
7/8) down to the jacket. With the inner pairs 4 8) Slide the strain relief up the cable matching
(3/6, 4/5), leave 1/2” of foil on the pairs. Do not the word “PoE+” on the same side of the
separate the wires yet. connector. Push the strain relief and connector
4) Pinch the inner pairs (4/5, 3/6) together until the parts click into place.
together to thread through 7
the wire tray.
PoE+ 10Gig Shielded RJ45 Field Plugs 8
See Page 51
Cat6A Flex Connector Termination Guide
1) Tools required: Flush cutters 5) Using flush cutters trim the excess
(PN 10531C), a cable jacket 1 wire flush with the connector wire 5
stripping tool (PN 15010C), guide ensuring all wires are in
and the flex connector. the correct slots.
6) Once all conductors are cut flush
you are ready for termination. 6
2) Strip jacket and remove any pull 2
cords or internal strength members.
Shown is wiring for TIA568B. Cut
Green and Blue pairs shorter for
easier wire management. 7) Fold over the wiring guide and
press firmly to close. With larger 7
3) Slide pairs into the connector 3 conductors there may be some
orienting them according to the resistance and a set of pliers can
colors on the wiring guide. Seat be used to finish the termination.
the cable jacket up against wire 8) Once connector is snapped closed,
guide. use the included cable tie to secure 8
the cable jacket onto the connector.
4) Untwist pairs and align in the Insert through the slot on the back
corresponding wire slots in the 4 end and wrap around the cable
wire guide. The wires will seat jacket.
into these guides and stay firmly
in place.
9) Cinch the cable tie tight and the 9
termination is complete.
Cat6A Flex
Connectors
See Page 44
www.platinumtools.com See Page 106 For Warning Information 109