
Page 376 - 凯尼派克英文通用样本2024knipex
P. 376
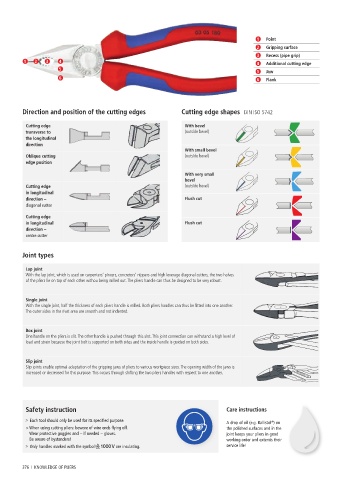
1  Point
                                                                                           2  Gripping surface
                                                                                           3  Recess (pipe grip)
         1   2   3    4
                                                                                           4  Additional cutting edge
                      5
                                                                                           5  Jaw
                      6                                                                    6  Flank


         Direction and position of the cutting edges             Cutting edge shapes   DIN ISO 5742

          Cutting edge                                            With bevel
          transverse to                                           (outside bevel)
          the longitudinal
          direction
                                                                  With small bevel
          Oblique cutting                                         (outside bevel)
          edge position

                                                                  With very small
                                                                  bevel
          Cutting edge                                            (outside bevel)
          in longitudinal
          direction –                                             Flush cut
          diagonal cutter

          Cutting edge
          in longitudinal                                         Flush cut
          direction –
          centre cutter


         Joint types

          Lap joint
          With the lap joint, which is used on carpenters‘ pincers, concretors’ nippers and high leverage diagonal cutters, the two halves
          of the pliers lie on top of each other withou being milled out. The pliers handle can thus be designed to be very robust.


          Single joint
          With the single joint, half the thickness of each pliers handle is milled. Both pliers handles can thus be fitted into one another.
          The outer sides in the rivet area are smooth and not indented.


          Box joint
          One handle on the pliers is slit. The other handle is pushed through this slot. This joint connection can withstand a high level of
          load and strain because the joint bolt is supported on both sides and the inside handle is guided on both sides.


          Slip joint
          Slip joints enable optimal adaptation of the gripping jaws of pliers to various workpiece sizes. The opening width of the jaws is
          increased or decreased for this purpose. This occurs through shifting the two pliers handles with respect to one another.


          Safety instruction                                                     Care instructions

          >   Each tool should only be used for its specified purpose.           A drop of oil (e.g. Ballistol ) on


                                                                                                ®
          >  When using cutting pliers: beware of wire ends flying off.          the polished surfaces and in the
           Wear protective goggles and – if needed – gloves.                     joint keeps your pliers in good
           Be aware of bystanders!                                               working order and extends their
          >   Only handles marked with the symbol    are insulating.             service life!

           376  I KNOWLEDGE OF PLIERS